Introduction What can be found in this package and what it can be used for
Thank you for purchasing a Magento theme. This documentation consists of several parts and shows you the entire process of setting up and administering a Magento shop from scratch. We did our best to make this manual as clear and easy to follow as possible.
What is Magento Commerce?
Magento is a feature-rich eCommerce platform built with open-source technology that provides online merchants with unprecedented flexibility and control over the look, content and functionality of their eCommerce store. Magento’s intuitive administration interface features powerful marketing, search engine optimization and catalog-management tools to give merchants the power to create sites that are tailored to their unique business needs. Designed to be completely scalable and backed by Varien's support network, Magento offers companies the ultimate eCommerce solution. Learn More
What is a Magento theme?
Magento theme is a skin for your Magento shop. In other words, you can easily change your Magento shop appearance installing a new theme in a few easy steps. With all of its simplicity a Magento theme is provided with all the necessary source files that you can edit or extend the way you need.
Files structure
The theme package you have downloaded consists of several folders. Let's see what each folder contains :
- screenshots - contains the theme screenshots. Not for production
- sources - contains the theme source files
- psd - the theme Adobe Photoshop source files (.psd)
- demo - contains additional pages and custom blocks provided with the theme
- sample_data - contains Magento theme sample content files
- media - contains files and directories that should be uploaded to the root directory of your Magento installation
- dump.sql.gz - the database backup file. Contains the theme sample content.
- theme### - contains Magento theme files and directories that should be uploaded to the root directory of your Magento installation
- fonts_info.txt - contains the links where the template custom fonts can be downloaded
- info.txt - contains instructions on how to extract source files.
Preparations
Magento e-commerce engine requires MySQL database to store data. Before you proceed with the Magento installation please make sure you've already created the MySQL database. This can be done with your hosting control panel or the phpMyAdmin tool.
Please check the detailed tutorial on how to create MySQL database. In case of any issues please contact your hosting provider for further assistance.
During the MySQL database creation procedure you'll get the database details like: database name, username, password and database server. Remember these details as you'll need them for the Magento installation.
Magento engine installation
1. Server requirements
Please make sure your hosting server meets Magento requirements:
- System: Unix, Linux or Windows. Unix is highly recommended.
- Web server: Apache Web server 1.3 or later, Microsoft's IIS Web server 6.0 or later, and nginx 1.0 or later.
- PHP 5.2* or later.
- MySQL 5.0 or later.
- At least 32 Mb of RAM on your server (64 Mb is comfortable, the more the better).
Magento can work with PHP 5.1 or later, but versions inferior to 5.2 have bugs that might prevent some functions to work as expected (such as invalid date timezone).
2. Downloading
To install Magento you need to download the Magento engine package from the official website at www.magentocommerce.com/download.
Input your name and e-mail into the Download box and click the 'Download' button.
Please make sure your version of Magento engine matches the template requirements. All versions of Magento are available at SourceForge.
3. Extracting Files
When you are done with the download you'll need to extract the files from the Magento engine package.
This can be done with any archive manager like WinZip(PC), StuffitExpander(MAC), etc.
Please check the following tutorials on how to extract files from the archives with WinZip(PC) and StuffitExpander(MAC).
Please note: if your hosting control panel has the option to 'Extract' files, you can use it and extract the files directly on your server after the upload.
4. Uploading Magento engine files
In case you extracted the files locally on your computer, you need to upload them to your hosting server.
This can be done using the hosting control panel File Manager or with some third party FTP Manager applications like FileZilla, TotalCommander, CureFTP, etc.
You can check the detailed video tutorial on how to upload files to a server using an FTP manager and how to upload files to a server using cPanel (WebHost Manager, WHM).
5. Magento engine installation
When you are done with the files upload you can start the Magento engine installation. Open your browser and in the address bar type your 'domain name/path to your Magento directory'. You should see the welcome screen. Please follow the instructions below to install Magento.
Please note: the dump.sql.gz file should be imported into the clear database BEFORE you install Magento.
The Magento template package contains the sample data file (dump.sql or dump.gz). This file is located in the /sources/sample_data directory of your template package. This file installs the template sample data and makes your website look the same as the template preview.
To install the dump file please perform the following:
- Open your database management tool (PhpMyAdmin). It can be accessed through your Hosting Control Panel.
- Create a new database.
- Select the database you created for the Magento CMS.
- Select the "IMPORT" option and click the "Browse" button.
- Navigate to the "/sources/sample_data" folder of the template and select the dump.sql.gz file.
- Press the "GO" button.
Do not use the dump.sql.gz file if you have a running store. The dump.sql.gz file import into your live database will remove your products. If you don't want to install the template sample content, please install Magento over the clear database. Skip the sample data installation step of this manual.
Magento template installation
The next step of the setup procedure is the template installation. The template should be installed in any case, whether you use sample data or not.
- First of all, open the template package and go to the theme### folder.
- Upload theme### folder contents to the Magento installation directory (upload "app," "skin" and other folders). These folders contain the theme files. They will not affect your existing files.
- If you have imported the dump.sql.gz file and are going to use the template sample products, you need to upload the product images. Upload the "media" folder from the template sources/sample_data directory to the Magento installation root directory.
- If you didn't install the dump.sql.gz file, there is no need to upload the "media" folder.
Step 1: Installation Assistant
Please read the license agreement and click the "I agree to the above terms and conditions" checkbox if you agree with the terms.
Step 2: Installation Assistant (Localization )
Select the Locale, Time Zone and default currency. The Locale option defines your Magento store backend language. If you want to change the frontend language, you need to download and install Magento frontend locales. All the options can be easily changed later using the Magento admin panel.

Step 3: Configuration
Here you need to input the store database details and some initial settings. Database Connection – input the database host name, user name, password and name. Contact your hosting provider if you don't have the necessary details.
Make sure you have a database created for the Magento installation. And also make sure it is clear, without any tables. Web access options and Session Storage Options – please leave the options without any changes if you are not sure. The default settings usually work fine.

If everything is correct please click the 'Continue' button.
Step 4: Create Admin Account
Here you need to input personal details for the store owner and administrator.
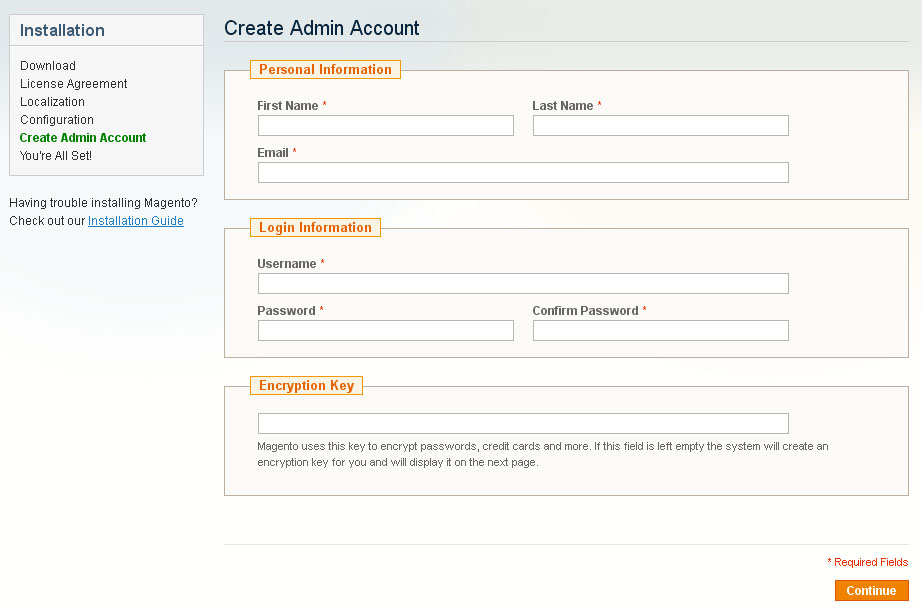
When you are done click the 'Continue' button.
Step 5: You are All Set
This is the final step of the installation. Copy the generated encryption key and keep it safe. You can use the buttons in the bottom right corner to view the store front end and the admin panel.

Installing Magento template over existing website
1. Manual template configuration
First of all, please make sure your Magento installation meets the template requirements. If you are using an outdated version of Magento, you need to upgrade it. Don't forget to back up the files and the database. Magento upgrade instructions are available at the Magento Wiki website.
If your Magento engine meets the template requirements, you can start the template installation.
- Open the template package and go to the theme### folder.
- Upload theme### folder contents to the Magento installation directory (upload "app," "skin" and other folders). These folders contain the theme files. They will not affect your existing files.
1. Template configuration
This step is used to configure the template manually.
- Activate new theme
- Open the Magento admin panel and in the top menu select System > Design.
- Click the "Add Design Change" button.
- In the "Custom Design" field select the theme name (in this case theme###).
- Click the "Save" button to confirm the changes.
- Reindex data
- Open the Magento admin panel and in the top menu select System > Index Management.
- Check the "Select All" box in the top left corner.
- Then on the right in the "Actions" field select "Reindex Data."
- Click the "Submit" button.
- Please be patient, this may take a while.
2. Logo configuration.
Please follow this step if you have issues with the logo image.
- Open the Magento admin panel and in the top menu select System > Configuration.
- Select the "Design" tab.
- In the "Header" section, edit the "Logo Image Src" field value. Change it from "gif" to "png."
- Click the "Save Config" button.
3. Pages configuration
The template home page can contain such layout objects as banners, slider, gallery, flash animation, etc. To add the blocks to your store please use the instructions below.
We recommend that you disable the WYSIWYG editor. To do this from the admin top menu select System > Configuration. Open the "Content Management" section and in the WYSIWYG Options window set "Enable WYSIWYG Editor" option to "Disabled Completely."
- From the top menu select CMS > Pages. The Home page, About Us and Customer Service pages should already be available, so you don't need to add them. You only need to update the page's HTML and XML content.
- In case you need to add a new page, click the "Add New Page" button in the top right corner.
- Open the page and select the Content tab. The Content tab contains the HTML code of the page. You can take the page HTML code from the appropriate source file. You can see the list of source files in the table below. Copy the code from the source file and paste it to the content area.
- When you are done with the HTML code, switch to "Design." It contains the page XML code. The XML code should be copied the same way as the HTML from the source file. Copy the XML code to the "Layout Update XML" area.
- Don't forget to select the valid "Layout" option.
In case of any difficulties please check the detailed tutorial on how to configure pages manually.
| # | Page Name | Page HTML (Content tab) | Page XML (Design tab) | Layout |
|---|---|---|---|---|
| 1. | Home Page | sources\demo\pages\home_page.phtml | sources\demo\pages\home_page.xml | 1 columns |
| 2. | About Us | sources\demo\pages\about_us.phtml | NA | 1 columns |
| 3. | Customer Service | sources\demo\pages\customer_service.phtml | NA | 1 columns |
| 4. | Privacy Policy | sources\demo\pages\privacy_policy.phtml | NA | 1 columns |
4. Static blocks configuration
When you are done configuring pages you need to configure the static blocks. The procedure is similar - you need to copy the code from the source files.
- From the top menu select CMS > Static Blocks.
- Click the "Add New block" button in the right corner to add a new block.
- Input the block name and identifier. You can get the block details from the table below.
- Open the block source file and copy the HTML code into the content area.

Please note: some templates do not have any static blocks, so the table below can be empty.
| # | Block Name | Block Title | Identifier | Content |
|---|---|---|---|---|
| 1. | Footer List | Footer List | footer_list | sources\demo\static_blocks\footer_list.phtml |
| 2. | Custom tab | Custom tab | custom_tab | sources\demo\static_blocks\custom_tab.phtml |
| 3. | contact_block | contact_block | contact_block | sources\demo\static_blocks\contact_block.phtml |
| 4. | Map contents | Map content | map_content | sources\demo\static_blocks\map_content.phtml |
| 5. | Footer info | Footer info | footer_info | sources\demo\static_blocks\footer_info.phtml |
The source files with the static blocks code are stored in the "sources\demo\static_blocks\" directory of the template package.
When you are done configuring store pages and blocks your store is ready to go.
2. General Customization
While editing the pages and static blocks we recommend disabling the WYSIWYG editor. To do this from the admin top menu select System > Configuration. Open the "Content Management" section and in the WYSIWYG Options window set "Enable WYSIWYG Editor" option to "Disabled Completely."
1. How to edit pages
-
From the top menu select CMS > Pages. All the store pages are available here. Open any of them to access the page content.

- From the left column select the Content tab. It contains the HTML code of the page. You are free to edit the code the way you need.
- Switch to "Design" tab to get access to the page XML content. XML code lets you embed Magento static blocks or widgets into the page.
2. How to edit static blocks
From the top menu select CMS > Static Blocks.

For example, please open a static block. You can see its HTML content. In this example we use the banners block. Using the HTML code you can easily change the banner image and link.

3. How to configure the Currency module
- Open the Magento admin panel.
- From the top menu select System > Configuration.
- Then click General and select the tab Currency Setup.
- In the Currency Options holding the CTRL button select the allowed currencies that can be used to display prices in your Magento store. When you are done click the Save Config button to save your changes.
- Then go to System > Manage Currency Rates from the top menu.
- Set the required currency rate values or use the Import Service. Click the Save Currency Rates button to save your changes.
4. How to edit the Polls module
From the top menu select CMS > Polls.

Extensions configuration
1. Olark Live Chat
To set up a live chat like the one on the Live Demo, you'll need to register on the official Web site Olark registration. After you provide all the data required, you'll get a code to add through your admin panel.

2. Cloud Zoom
The Cloud Image Zoom settings allow to change the pop-up picture dimensions and to set the image's original size.

3. Add This
The Sharing Tool settings let you choose how the icons are displayed. The recommended settings are shown in the picture.

4. Cookie Policy
Cookies are small text files which websites place on visitors’ computers. They’re typically used to identify that particular visitor and provide them with a better experience. Cookies are a crucial part of many website functions which we take for granted.
For instance, it’s usually cookies which allow online shops to remember what items you have in your shopping trolley. They’re also used to keep you logged in to a website or to provide valuable usage statistics and information to website owners.
If you run a website, it almost certainly uses cookies. Their most likely function is to monitor visitors numbers and behaviours through tools like Google Analytics. They may also be used to display relevant adverts to visitors, or – if you sell online – to power key parts of your online shopping system.
26th May 2012 - The ICO released a change to the enforcement, "implied consent" is now allowed as long as you make it clear where your privacy/cookie policy is.
Following the Cookie Law conditions, you should add appropriate modules to your website that will display a warning message about the cookies used on your website. We can recommend the following ones:
Conclusion
Magento engine is a great solution for your online store. The default engine package contains all the modules necessary for successful sales. Open source allows you to offer really outstanding merchant possibilities for your customers. However, due to the quite complex engine structure advanced usage of Magento will require a lot of time and aspiration. You'll need much more than this manual.
The following resources will help you to become a true Magento professional: