SiteCatalyst Tagging
Collect visitor analytics using SiteCatalyst JavaScript Tagging
The table of contents for this tutorial
What you will learn in this tutorialPrerequisite knowledge and system permissions
Download code files for this tutorial
An overview of SiteCatalyst JavaScript Tagging
An overview of the demo application for this article
A code overview for the demo application
Step 1: Generate your SiteCatalyst-specific JavaScript code
Step 2: Set traffic variables
Step 3: Add pre-defined events
Step 4: Add a custom link
Step 5: Add a custom event
Step 6: Set the transactionID for offline data
Step 7: Set the purchaseID variable
Step 8: Set custom conversion variables
Step 9: Retrieve a URL variable using a SiteCatalyst plug-in script
Step 10: Verify the tagging code with the Adobe DigitalPulse Debugger
Step 11: Verify data collection in SiteCatalyst
Related articles
What you will learn in this tutorial
SiteCatalyst enables you to collect valuable online analytics data from your web site in two ways (see Figure 1):-
Client-side using SiteCatalyst JavaScript Tagging
-
Server-side using the Data Insertion API
For complete documentation on tagging, refer to the SiteCatalyst Implementation Guide. To learn more about using the server-side Data Insertion API, read the Collect visitor analytics using the Data Insertion API article. Information about tagging for mobile devices can be found in the Mobile Device Measurement implementation guide.
Figure 1. This article focuses on SiteCatalyst JavaScript Tagging to collect web site visitor’s online analytics data
Prerequisite knowledge, system permissions and environment setup
This tutorial is for web developers who have:-
Knowledge of HTML and JavaScript
-
An installed IDE for HTML and JavaScript development.
Download code files for this tutorial
This tutorial walks you through the starter files and shows you how to add the tagging code. You can also download the solution files to compare your finished code.Unzip these files to a project folder in your IDE.
An overview of SiteCatalyst JavaScript Tagging
SiteCatalyst JavaScript Tagging is the process of adding JavaScript code to your web site pages to collect visitor data. You implement it with two elements:-
JavaScript page code: A block of SiteCatalyst-specific JavaScript code that goes directly in the body section of each HTML page.
-
JavaScript library file: A collection of SiteCatalyst-specific methods and global SiteCatalyst variables stored in a separate file which is called from the JavaScript page code.
Figure 2. An overview of the SiteCatalyst JavaScript Tagging code
The SiteCatalyst JavaScript Tagging code builds an image request for a 1x1 pixel image, also called a web beacon, that concatenates a query string of name/value pairs of analytics data to send to the Adobe Data Collection Layer (see Figure 3).
The web beacon image, which is just a dummy request to pass the data, is returned to your web page, but is not displayed.
Figure 3. An overview of the SiteCatalyst JavaScript Tagging code
The web analytics data sent from your site to the Adobe Data Center is collected and stored in data repositories called report suites, which are the basis of all SiteCatalyst reports.
An overview of the demo application for this article
All of the articles and tutorials in this series are based on Adobe’s JJ. Esquire demo application (www.jjesquire.com). This tutorial walks you through the steps of adding SiteCatalyst JavaScript Tagging code to four pages in the simplified JJ. Esquire demo application.Figure 4, shows five web pages, where the first page represents the Referring Page of a campaign. It has a simple link that contains the campaign code in a query string. You will use this value to track how the visitor arrived at your site.
Figure 4. An overview of the JJ. Esquire demo application
The other four pages (Product List, Product Detail, Shopping Cart, Confirmation) represent pages in a typical e-commerce site. You will add SiteCatalyst JavaScript Tagging code to these pages to collect visitor data.
To explore the JJ. Esquire demo application, follow these steps:
-
Download the SiteCataylst_tagging_starter.zip file from the Downloads section of this article and extract the contents to your computer.
-
Move the files to a new web project in Eclipse or your IDE of choice.
-
Open the referring_page.html file in a browser.
-
Mouse over the Go to JJ. Esquire demo application... link and notice that the query string in the link contains the property for the campaign ID, named cid.
-
Click on the link to see to the Product List page.
The Product List page displays three items in Women’s Activewear.
-
Click the Fur-Trim Ski Jacket to navigate to the Product Detail page.
Note the two links on the Product Detail page. The Add To Cart link takes you to the Shopping Cart page. The Purchase By Phone link is used to track offline sales.
-
Click OK to close the popup window.
-
Back in the Product Detail page, click the Add To Cart link.
The Shopping Cart page displays the Fur-Trim Ski Jacket.
-
Click the Checkout link.
The Purchase Confirmation page displays an Order Confirmation message.
A code overview for the demo application
You will add the JavaScript page code to each page of the JJ. Esquire demo application. You will also add the JavaScript library file to a folder and then reference it from the other pages as necessary.As you navigate through each page of the application, the JavaScript code sends analytics data to the Adobe Data Collection Layer. You will monitor this data transfer using the DigitalPulse Debugger and will verify the data collection by running SiteCatalyst reports.
Figure 5 shows the SiteCatalyst JavaScript Tagging code you will be setting on each web page.
Figure 5. SiteCatalyst Tagging within the JJ. Esquire demo application
The blue code in Figure 5 shows traffic variables, which are non-persistent variables used to count the number of times each value is sent to SiteCatalyst. There are pre-defined and custom traffic variables. Examples of pre-defined traffic variables are pageName, server, and channel. You can create your own custom traffic variables, also called props.
The green code in Figure 5 are conversion variables, which are persistent variables also called eVars. These variables are associated with an event and are recorded when the event is triggered.
The pink code in Figure 5 is the s.products conversion variable which is used in conjunction with an event to pass product information. Unlike eVars, this variable is not persistent and can hold multiple values.
The red code in Figure 5 are events, which are actions performed by the visitor that you want to track. There are pre-defined events (like prodView, scAdd, and purchase) and custom events (event1-100).
You will learn how to implement all of this code in this tutorial.
Step 1: Generate your SiteCatalyst-specific JavaScript code
In this section, you will generate the JavaScript page code and the JavaScript library file using the SiteCatalyst UI in the Adobe Online Marketing Suite.Note: If you do not have access to the Adobe Online Marketing Suite, contact your administrator for access or to have them generate the files for you.
-
Login to the Adobe Online Marketing Suite and select Admin in the upper left corner, and then Admin Console.
Figure 6. Select Admin Console from the Admin menu
-
In the left menu, select Admin Console > Code Manager.
-
In the Select the type of code to generate dropdown list, select JavaScript.
-
In the Select a Report Suite that collects data for your website dropdown list, select JJEsquire Getting Started Suite.
Note: You created the JJEsquire Getting Started Suite report suite in the Setup and Security tutorial.
-
Leave the other options to their default and click Generate Code.
-
Click OK for any warning messages that pop up.
Note: These warnings are there to emphasize that tagging can be complicated, and that you should work with an implementation consultant.
-
You will see the Page Code and Core JavaScript File code in tabs
-
Back in your IDE, locate the js folder of your project and open the provided s_code.js file.
-
Copy the code from the Core JavaScript File tab in the Code Manager to the s_code.js file.
The JavaScript library file is run one time when the first web page is loaded in the browser and is where you set account-specific variables like account and server. Since this file is referenced by each page in your site (see Figure 7), these variables are universally available.
Figure 7. Reference the SiteCatalyst JavaScript library file code from the page code
-
10. In the s_code.js file, notice that the s_account variable contains the value of your report suite ID. Locate the s.visitorNamespace and the s.trackingServer to see that Adobe has referenced the appropriate Company Login and Adobe Data Center server.
Note: The s.visitorNamespace variable does not have to be the Company Login. It’s purpose is to name the folder which stores the cookie that uniquely identifies the visitor.
The JavaScript page code uses “s” as the default reference object, which is instantiated in the library file. You declare variables as members of this object, and values are assigned within the page code.
Note: The s.server variable can be set in the s_code.js file to show the domain of a web page or the server serving the page. If your site has more than one domain serving the same content, you can use the server variable to track which of those domains is being used. The s.server variable can be set to location.hostname.
-
Return to the Code Manager in the browser and select the Page Code tab.
-
Locate the first script tag and see that the src property needs to reference the location for the s_code.js file on your server.
-
You have placed this file in the js folder, so change the script tag to reflect this relative path as shown in the following code:
Page Code tab change
-
Below the Page Code tab, locate the Save Tracking Code section and set the Code Archive Name field to JJEsquirePageCode.
-
In the Code Archive Description field, type Page code for the JJ Esquire Getting Started demo application.
-
Click Save to see this archive appear at the bottom of the Generate Code page.
-
Click on the JJEsquirePageCode archive to return to the Page Code tab and copy all of the code in the tab.
-
In the following HTML files, locate the comment that says Begin Paste the SiteCatalyst JavaScript Page code here and then paste the Page Code below the comment:
- list.html
- detail.html
- cart.html
- purchase.html
Note: Do not paste the code into the referring_page.html file, since it represents an external web site.
Step 2: Set traffic variables
Remember that a traffic variable is a non-persistent metric associated with a page view. Pre-defined traffic variables include pageName, server, and channel.The pageName variable contains the name of each page on your site. This value should be familiar to business users, such as Home Page, Purchase, or Registration. If pageName is left blank, a less reader-friendly URL is used to represent page name in SiteCatalyst reports.
-
Locate the s.pageName variable in the JavaScript page code you pasted for each of the HTML files and set the values as outlined in the following code block.
s.pageName//set in list.html
s.pageName = "Product List Page"
//set in detail.html
s.pageName = "Product Detail Page"
//set in cart.html
s.pageName = "Shopping Cart Page"
//set in purchase.html
s.pageName = "Purchase Confirmation Page"
The channel variable is used to identify a section of your site. Values for a shopping site might include Electronics, Toys, or Apparel. Sections for a media site may include News, Sports, or Business.
Adobe recommends that you populate the channel variable on every page.
s.channel//set in list.html
s.channel = "Women's Dept"
//set in detail.html
s.channel = "Women's Dept"
//set in cart.html
s.channel = "Women's Dept"
//set in purchase.html
s.channel = "Women's Dept"
If you want to create your own variables to track, you can create up to 75 custom traffic, or prop, variables. Examples might include sub section, content type, language or template name.
In this JJ. Esquire demo application, you will set the s.prop1 variable to the currently selected sub-category or product in a department.
-
Set the s.channel variable to Women’s Dept in each of the HTML files as outlined in the following code block.
-
Set the s.prop1 variable to Activewear in the list.html page since this is the first sub-category of the Women’s department.
-
Set the s.prop1 variable to Ski Jacket in each of the remaining HTML files as outlined in the following code block, since Ski Jacket is the product in Activewear.
s.prop1//set in list.html
s.prop1 = "Activewear"
//set in detail.html
s.prop1 = "Ski Jacket"
//set in cart.html
s.prop1 = "Ski Jacket"
//set in purchase.html
s.prop1 = "Ski Jacket"
Collected custom traffic data will appear in the SiteCatalyst Custom Traffic reports. You will view reports for your collected data at the end of this tutorial.
Step 3: Add pre-defined events
An event is a visitor activity on your web site. SiteCatalyst provides both pre-defined and custom events. In this section you will learn about predefined events.The pre-defined events are prodView, scView, scOpen, scAdd, scRemove, scCheckout, and purchase.
SiteCatalyst stores events as counters, or metrics. Each time an event occurs, an instance of the event is incremented and represents a successful visitor activity.
Events are associated with the s.products variable which stores additional information about the event. The s.products variable, stores the following parameters for one or more products.
s.products parameters
s.products = "Category; Product; Quantity; Price [, Category; Product; Quantity; Price]"
Note: Use a semicolon between values in one product and a comma to separate products.
In this JJ. Esquire demo application, you will use the prodView event to track each time the Product Detail page for the Ski Jacket is viewed. You will also use the s.products variable to collect data on the category and product.
-
Set the s.events variable in the detail.html file to prodView.
-
Set the s.products variable in the detail.html file to Activewear; 100241, where 100241 is the SKU number for the jacket.
prodView event//set in detail.html
s.events = "prodView"
s.products = "Activewear; 100241"
You should use the pre-defined scAdd event to track each time a product is added to the shopping cart. You will also use the s.products variable with the scAdd event to collect the category, product, quantity, and price details of the product.
-
In the cart.html file, set the s.events variable to scAdd.
scAdd event//set in cart.html
s.events = "scAdd"
s.products = "Activewear; 100241; 1; 455.00"
You should use the pre-defined purchase event on the final confirmation page. Again, you will use the s.products variable with the event to capture the category, product, quantity, and price.
-
In the purchase.html file, set the s.events variable to purchase.
Set the s.products variable to Activewear; 100241; 1; 455.00. -
purchase event//set in purchase.html
s.events = "purchase"
s.products = "Activewear; 100241; 1; 455.00"
Step 4: Add a custom link
On the Product Detail page of this JJ. Esquire demo application, there is a link to PURCHASE BY PHONE. Visitors can use this link to talk to someone in the JJ. Esquire Call Center. You want to track that users have clicked this event as part of the SiteCatalyst data that you are passing to the Adobe Data Collection Layer.-
In the detail.html code, locate the PURCHASE BY PHONE anchor tag. Notice the HTML onClick event executes the sendCallCenterData() JavaScript function.
HTML onClick event//locate in detail.html
onClick="sendCallCenterData();return false;">PURCHASE BY PHONE
Now, you will add some SiteCatalyst-specific JavaScript code to the sendCallCenterData() function to track the visitor click.
Remember that all visitor data is stored in the s object, so the first step for tracking this new link is to instantiate the s object using the s_gi() function from the s_code.js library. This function requires the reportSuiteID parameter, which is stored in the s_account variable in the s_code.js library.
-
In the detail.html file, locate the sendCallCenterData() function and add a call to the s_gi() function with the s_account variable as the one argument. Set the s object equal to the function call.
s_gi function//set in detail.html
function sendCallCenterData() {
s=s_gi(s_account);
}
The next step is to send the visitor click data to the Data Collection Layer. You will use the Track Link function, named s_tl(), from the s_code.js library file to do this. This method requires you to specify the parameters shown in Table 2.
Property Description HREF property of the link Set the value to this to self-reference the link URL. If the object has no HREF property then set the value to true. linkType Set the value to the following:
- o; for Custom Links
- e; for Exit Links
- d; for File Downloads
linkName Set a name for this link. It is used in SiteCatalyst reports.
Table 2. s_tl() function properties
-
In the sendCallCenterData() function, call the s_tl() function and set the HREF property to true, the linkType to o, and the linkName to Call Center Link
s.tl function//set in detail.html
function sendCallCenterData() {
s=s_gi(s_account);
s.tl(true,'o','Call Center Link');
}
Now when visitors click the Purchase by Phone link, their action is recorded in SiteCatalyst link event named Call Center Link.
Add a custom event
SiteCatalyst link events cannot be used in as many reports as custom events. You can associate custom events to your link events in order to track them in more reports.Remember that SiteCatalyst has both built-in pre-defined events, like prodView and purchase, but it also provides you with the opportunity to create up to 100 custom events (named event1 - event100).
In this JJ. Esquire demo application, you will use the custom event, event1, to track the number of people who contact the call center by clicking on the Purchase by Phone link.
Use the SiteCatalyst s.events variable to set custom events for tracking.
-
In the detail.html page, set the s.events variable to event1 in the custom link code.
Note: To create a friendly name to represent your custom events, type it in the Admin Console within the SiteCatalyst UI. A friendly name is easier to read in reports. Navigate to Admin Console > Report Suite > Edit Settings > Conversion > Success Events. Select event1 and give it a name of Call Center Click.
s.events//set in detail.html
function sendCallCenterData() {
s=s_gi(s_account);
s.events='event1';
s.tl(true,'o','Call Center Link');
}
linkTrackEvents is a comma separated list of events that will be sent with custom, exit, and download links. Its purpose is to filter out events that were previously set and identify those events to be sent with the associated link.
If an event is not in linkTrackEvents, then it will not be sent to SiteCatalyst when the associated link is clicked. The default value is set to “None”. linkTrackEvents is only recognized if linkTrackVars includes the value of “events”.
Only event names are allowed in linkTrackEvents. If linkTrackEvents contains spaces between event names, the events will not be recorded.
-
Add the linkTrackEvents variable to the custom link code within the detail.html page.
s.events//set in detail.html
function sendCallCenterData() {
s=s_gi(s_account);
s.events='event1';
s.linkTrackEvents='event1';
s.tl(true,'o','Call Center Link');
}
Set the transactionID for offline data
In the related article, Upload batched data using the Data Sources API, you will learn how to upload data about purchases made through the JJ. Esquire Call Center. However, you will need a mechanism to associate these purchases with the visitors who clicked on the Purchase by Phone link.SiteCatalyst provides an s.transactionID variable to provide reference to the visitor and their current session.
Note: You will not see values set for the s.transactionID within SiteCatalyst reports. It is only used to associate uploaded data with the online visit/visitor.
Remember that the popup that appears offers the visitor a 5% discount when they use this transactionID in their Call Center order. This incentive allows you to tie the user to the Call Center order.
Figure 8. The transaction ID ties the Call Center purchase data to the visitor
Note: You may need to ask your Adobe representative to enable the transactionID for recording. You can check whether the variable is enabled in Admin > Data Sources > Manage.
-
In the detail.html page, set the s.transactionID to 003456 in the custom link code.
s.transactionID//set in detail.html
function sendCallCenterData() {
s=s_gi(s_account);
s.events='event1';
s.linkTrackEvents='event1';
s.transactionID='003456';
s.tl(true,'o','Call Center Link');
}
linkTrackVars is a comma separated list of variables that is sent with custom, exit, and download links. It’s purpose is to filter out variables that were previously set and identify those variables to be sent with the associated link.
The default value is set to “None”. If you set linkTrackVars to “”, then all variables which have values will be sent. Adobe recommends listing all variables that are sent with link data.
If linkTrackEvents is used, then linkTrackVars should include the value of “events”. When populating linkTrackVars, do not use the “s.” prefix for variables.
-
Add linkTrackVars to the custom link code within the detail.html file, and set it’s value to “events, transactionID”.
linkTrackVars//set in detail.html
function sendCallCenterData() {
s=s_gi(s_account);
s.events='event1';
s.linkTrackEvents='event1';
s.transactionID='003456';
s.linkTrackVars='events, transactionID';
s.tl(true,'o','Call Center Link');
}
Step 7: Set the purchaseID variable
The s.purchaseID variable is used in conjunction with the purchase event. Its function is to keep orders from being counted multiple times in SiteCatalyst.Note: In a real-world scenario, you would set the s.purchaseID variable to a unique value, such as an order number, to prevent an order from being counted multiple times in SiteCatalyst. In this JJ. Esquire demo application, you will randomly generate an order number so that you can run this application multiple times to simulate new order data.
-
In the purchase.html file, set the s.purchaseID variable to the order number as defined below. Place the orderNumber definition just above the s object assignments.
purchase event//set in purchase.html
// generate the order number randomly for this demo application
var orderNumber=Math.floor(Math.random()*100001);
/* You may give each page an identifying name, server, and channel on
the next lines. */
...
s.events = "purchase"
s.products = "Activewear; 100241; 1; 455.00"
s.purchaseID = orderNumber
Step 8: Set custom conversion variables
The s.purchaseID property that you added in the last section is used to avoid duplicated orders in SiteCatalyst. However, since it is not a conversion variable, aka eVar, associated with an event, you cannot run reports against it.In this JJ. Esquire demo application, you will add the orderNumber value to an eVar associated with the pre-defined purchase event. Remember that SiteCatalyst provides up to 100 custom conversion variables that are named eVar1 - eVar75. Conversion variables persist until they expire based on the values you set in the SiteCatalyst UI.
For more information about setting eVar expiration, see the Administration Console User Manual.
-
In the purchase.html file, below the s.purchaseID variable, set s.eVar1 to the orderNumber variable.
eVar1//set in purchase.html s.eVar1=orderNUmber
Step 9: Retreive a URL variable using a SiteCatalyst plug-in script
Remember that this JJ. Esquire demo application starts with a Referring page that references a campaign (see Figure 9) in the query string of the link to the JJ. Esquire web site.Figure 9. The Referring page embeds the campaign ID in the URL’s query string
You want to store this campaign ID in SiteCatalyst. In this section, you will learn how to use the s.getQueryParam() function to retrieve the campaign ID from the query string and store it in the s object that is passed to SiteCatalyst on the image request.
Note: You will need to get plug-in function code from your Adobe Online Marketing Suite administrator. Adobe offers a number of other plug-ins for advanced solutions. Detailed information about the s.getQueryParam plug-in is found within Adobe’s Knowledge Base.
-
Copy the following block of code for the s.getQueryParam() plug-in function and paste it in the s_code.js file at the end of the Config section.
getQueryParam plug-in/* Plugin: getQueryParam 2.3 */
s.getQueryParam=new Function("p","d","u",""
+"var s=this,v='',i,t;d=d?d:'';u=u?u:(s.pageURL?s.pageURL:s.wd.locati"
+"on);if(u=='f')u=s.gtfs().location;while(p){i=p.indexOf(',');i=i<0?p"
+".length:i;t=s.p_gpv(p.substring(0,i),u+'');if(t){t=t.indexOf('#')>-"
+"1?t.substring(0,t.indexOf('#')):t;}if(t)v+=v?d+t:t;p=p.substring(i="
+"=p.length?i:i+1)}return v");
s.p_gpv=new Function("k","u",""
+"var s=this,v='',i=u.indexOf('?'),q;if(k&&i;>-1){q=u.substring(i+1);v"
+"=s.pt(q,'&','p_gvf',k)}return v");
s.p_gvf=new Function("t","k",""
+"if(t){var s=this,i=t.indexOf('='),p=i<0?t:t.substring(0,i),v=i<0?'T"
+"rue':t.substring(i+1);if(p.toLowerCase()==k.toLowerCase())return s."
+"epa(v)}return ''");
Next, you will create your own s_doPlugin() function in the s_code.js library file to reference this plug-in function.
-
Copy the following plug-in configuration block of code and paste it into your s_code.js file at the end of the Config section.
plug-in configuration section/* Plugin Config */
s.usePlugins=true
function s_doPlugins(s) {
/* Add calls to plugins here */
}
s.doPlugins=s_doPlugins
-
Open the referring_page.html file and view the query string variable in the list.html anchor link code.
You should see the cid variable on the query string with a value of 112233.
query string variable//set in referring_page.html
JJ.Esquire Product List
Now you will use the SiteCatalyst s.getQueryParam() plug-in function in the s_code.js library file to read the campaign variable from the cid query parameter. -
Open the s_code.js file.
-
In the s_doPlugins function, set the s.campaign variable to the s.getQueryParam() plug-in function. Set the one function argument to the cid variable.
s.campaign/* Plugin Config */
s.usePlugins=true
function s_doPlugins(s) {
/* Add calls to plugins here */
s.campaign=s.getQueryParam("cid")
}
s.doPlugins=s_doPlugins
-
Save all of your files.
Step 10: Verify the tagging code with the Adobe DigitalPulse Debugger
In this section, you will use the Adobe DigitalPulse Debugger to verify the variable data being sent to SiteCatalyst while you step through the JJ. Esquire demo application (Figure 10).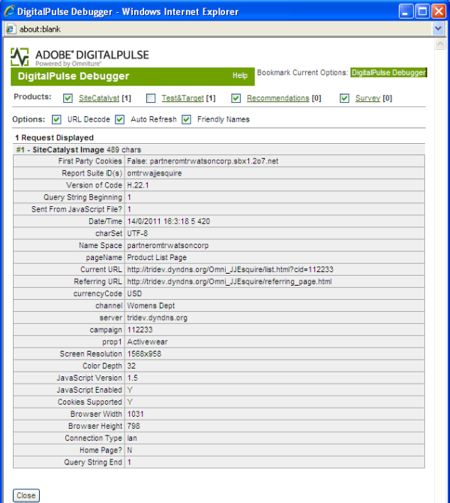
Figure 10. The Adobe DigitalPulse Debugger
Ordered List
-
Create a bookmark or favorite in your browser of choice.
-
Replace the URL in the bookmark with the following JavaScript code:
Digital Pulse Debugger codejavascript:void(window.open(%22%22,%22dp_debugger%22,%22width=600,height=600,location=0,menubar=0,status=1,toolbar=0,resizable=1,scrollbars=1%22).document.write(%22%3Cscript%20language=\%22JavaScript\%22%20id=dbg%20src=\%22http://www.digitalpulse.omniture.com/dp/debugger.js\%22%3E%3C/%22+%22script%3E%22));
-
Open the demo referring_page.html page in your browser.
-
Click the link on the page. It will take you to the JJ.Esquire Product List page.
-
Click the Digital Pulse Debugger bookmark.
If you get a browser security message about popup windows, allow the popup.
-
You should see a small pop-up window with the debugger in it.
-
Uncheck the Test&Target;, Recommendations and Survey checkboxes so that you can focus on the SiteCatalyst variables.
The DigitalPulse Debugger will refresh as you move from page to page, showing you the data collected across your entire site.
-
Since you are viewing the Product List page, the Debugger displays the variables for that page.
-
Click the Fur-Trim Ski Jacket.
-
View the variable values in the debugger for the Product Detail page.
-
Click the Purchase By Phone link.
-
Click OK. You will not see custom link data.
-
Click the Add To Cart link.
-
View the variable values in the debugger for the Shopping Cart page.
-
Click the Checkout link.
-
View the variable values in the debugger for the Purchase Confirmation page.
To learn more about the debugger, read the Adobe’s Digital Pulse Debugger documentation. To view additional data packet information as it flows accross the network, you may want to also use a packet analyzer such as Ethereal.
Step 11: Verify data collection in SiteCatalyst
In this section you will verify the measurement data sent to SiteCatalyst by viewing the reports in your report suite.Figure 11. The Adobe SiteCatalyst Dashboard
-
Log into the Adobe Online Marketing Suite and then select SiteCatalyst.
-
Make sure that the dropdown list in the upper right corner is set to your desired report suite. In this case it should be JJEsquire Getting Started Suite.
-
Go to Site Metrics > Page Views.
You should see the Page Views report.
Note: Some data may not appear immediately in your reports. Simple traffic data should show up within 5 minutes. Conversion reporting and some pathing related reporting may take longer.
-
Go to Site Metrics > Purchases > Revenue.
You should see purchase revenue data in the Revenue Report.
-
Go to Site Metrics > Shopping Cart > Cart Additions.
You should see data in the Cart Additions Report.
-
Go to Site Metrics > Custom Events > Custom Events 1-20 > Call Center Click.
You should see data in the Call Center Click Report.
Note: You will see Custom 1 in the SiteCatalyst UI if you did not give event1 the friendly name of Call Center Click.
-
Go to Site Content > Pages.
You should see the Pages Report with page views for the Product List Page, Product Detail Page, Shopping Cart Page, and Purchase Confirmation Page.
-
Go to Site Content > Site Sections.
You should see the Site Sections Report with page views for Women’s Dept.
-
Go to Site Content > Links > Custom Links.
You should see the Custom Links Report with instances of the Call Center Link.
-
Go to Campaigns > Tracking Code > Tracking Code.
You should see the Tracking Code Report for Campaign 112233.
-
Go to Products > Products.
You should see the Products Report for SKU 100241. If you do not see all the metric data for Product Views, Revenue and Cart Additions, do the following:
- click Add Metrics.
- When the pop-up window appears, double click Product Views, Revenue, and Cart Additions from the left column and it will be added to the right column.
- Click OK to close the window.
You should now see data in the Products Report.
-
Go to Custom Conversion > Custom Conversion 1-10 > Custom eVar1.
You should see the Custom eVar1 Report with data for the order number for the ski jacket.
-
Go to Custom Traffic > Custom Traffic 1-10 > Custom Insight 1.
You should see the Custom Insight 1 Report with data for Activewear and Ski Jacket. These are the prop variables that you defined in each page.
-
List Item
Related Articles
Explore the following resources to learn more:- SiteCatalyst Implementation Manual – http://microsite.omniture.com/t2/help/en_US/sc/implement/oms_sc_implement.pdf
- SiteCatalyst Mobile Device Measurement implementation guide - SiteCatalyst > Help > Product Documentation > Mobile Device Measurement guide
- Adobe Online Marketing Suite Administration Console user manual - https://sc.omniture.com/p/l10n/1.0/en_US/docs/AdminConsole_14_User_Manual.pdf
- Documentation for getQueryParam Plugin - SiteCatalyst > Help > Knowledge Base > Plug-in: getQueryParam
- Adobe’s Digital Pulse Debugger - http://blogs.omniture.com/2010/11/17/meet-the-new-digitalpulse-debugger/
- The Ethereal network protocol analyzer - http://www.ethereal.com/
- Web Analytics: Metrics, Dimensions, and Reports - http://blogs.omniture.com/2010/06/17/metrics-and-dimensions-and-reports-oh-my/